
我们以语言为分类总结一下。
记住所以的路径最终一般解析为文件系统路径
java
一、Linux和Windows路径分隔符
Linux下:”/”
Window下:”\\”
Java中通用:System.getProperty(“file.separator”);
二、相对路径
一般有两种写法file\ 和./file
2.1 相对路径的概念
相对路径指的是相对JVM的启动路径。
举个例子:假设有一java源文件Example.java在d盘根目录下。我们进入命令行窗口,进入到d盘根目录下,然后用“javac Example.java”来编译此文件,编译无错后,会在d盘根目录下自动生成”Example.class”文件。我们再调用”java Example”来运行该程。此时我们已经启动了一个jvm,这个jvm是在d盘根目录下被启动的,所以此jvm所加载的程序中File类的相对路径也就是相对这个路径的,即d盘根目录D:\。
搞清了这些,我们可以使用相对路径来创建文件,例如:
File file = new File(“a.tx”);
file.createNewFile();
假设jvm是在”D:\”下启动的,那么a.txt就会生成在D:\a.txt;
2.2 如何通过文件路径创建文件对象
下面的ResourceTest项目中有4个文件,1.properties、2.properties、3.properties、4.properties。
当我们需要使用这4个文件的时候,怎样创建文件对象呢?
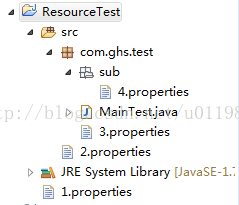
编译后,4个文件的路径如下:
ResourceTest/1.properties
ResourceTest/bin\2.properties
ResourceTest/bin\com\ghs\test\3.properties
ResourceTest/bin\com\ghs\test\sub\4.properties
前面我们说过,JAVA中文件路径是相对JVM的启动路径的,对于简单的JAVA项目,其JVM是在项目名称下启动的,所以,ResourceTest中4个文件的相对路径分别是:
./1.properties 或者1.properties
./bin\2.properties 或者 bin\2.properties
./bin\com\ghs\test\3.properties 或者bin\com\ghs\test\3.properties
./bin\com\ghs\test\sub\4.properties 或者 bin\com\ghs\test\sub\4.properties
附:“.”或”.\”代表当前目录,这个目录也就是jvm启动路径。
1 | public class MainTest { |
程序运行结果如下:
true:D:\me\open\open-project\ResourceTest\1.properties
true:D:\me\open\open-project\ResourceTest\bin\2.properties
true:D:\me\open\open-project\ResourceTest\bin\com\ghs\test\3.properties
true:D:\me\open\open-project\ResourceTest\bin\com\ghs\test\sub\4.properties
上面创建文件的方式太过于繁琐,所以一般情况下,对于test2.txt和text3.txt的获取,我们倾向于采取下面的方法:
File file2 = new File(Test.class.getResource(“/test2.txt”).toURI());
File file2 = new File(Test.class.getResource(“test3.txt”).toURI());
Tomcat中的情况,如果在tomcat中运行web应用,此时,如果我们在某个类中使用如下代码:
File f = new File(“.”);
String absolutePath = f.getAbsolutePath();
System.out.println(absolutePath);
那么输出的将是tomcat下的bin目录.我的机器就D:\work\server\jakarta-tomcat-5.0.28\bin\.,由此可以看出tomcat服务器是在bin目录下启动jvm的,其实是在bin目录下的“catalina.bat”文件中启动jvm的。
2.3 当前目录和上级目录
“.”或”.\”代表当前目录,这个目录也就是jvm启动路径。
下面的代码能得到当前完整目录:
File f = new File(“.”);
String absolutePath = f.getAbsolutePath();
System.out.println(absolutePath);//D:\
在当前目录下建立文件:File f = new File(“.\\test1.txt”);
“…”代表当前目录的上级目录。
在上级目录建立文件:File f = new File(“…\\…\\test1.txt”);
三、getPath()、getAbsolutePath()、getCanonicalPath()的区别
getPath()获取的是新建文件时的路径,例如:
File file1 = new File(“.\\test1.txt”);通过getPath()获取的是.\\test1.txt
File file = new File(“D:\\Text.txt”);通过getPath()获取的是D:\\Text.txt
getAbsolutePath()获取的是文件的绝对路径,返回当前目录的路径+构造file时候的路径,例如:
File file1 = new File(“.\\test1.txt”);通过getAbsolutePath()获取的是D:\workspace\test\.\test1.txt
getCanonicalPath()获取的也是文件的绝对路径,而且把…或者.这样的符号解析出来,例如:File file = new File("…\\src
\\test1.txt");通过getCanonicalPath()获取的是D:\workspace\src\test1.txt
四、获取上级目录
getParent()或者getParentFile();
五、获取资源的路径
Java中取资源时,经常用到Class.getResource()和ClassLoader.getResource(),这里来看看他们在取资源文件时候的路径问题。
1.Class.getResource(String path)
path 不以’/'开头时,默认是从此类所在的包下取资源;path 以’/'开头时,则是从ClassPath根下获取;
什么意思呢?看下面这段代码的输出结果就明白了:
1 | package testpackage; |
输出结果:
file:/E:/workspace/Test/bin/testpackage/
file:/E:/workspace/Test/bin/
上面说到的【path以’/'开头时,则是从ClassPath根下获取】,在这里就是相当于bin目录(Eclipse环境下)。
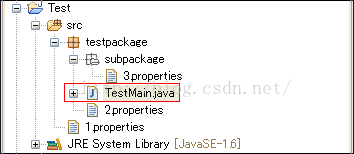
如果我们想在TestMain.java中分别取到1~3.properties文件,该怎么写路径呢?代码如下
1 | package testpackage; |
※Class.getResource和Class.getResourceAsStream在使用时,路径选择上是一样的。
2.Class.getClassLoader().getResource(String path)
path不能以’/'开头时;
path是从ClassPath根下获取;
Class.getClassLoader().getResource(String path)
1 | package testpackage; |
输出结果:
class testpackage.TestMainsun.misc.Launcher$AppClassLoader@1fb8ee3file:/E:/workspace/Test/bin/
null
从结果来看【TestMain.class.getResource(“/”) == t.getClass().getClassLoader().getResource(“”)】
上面同样的目录结构,使用Class.getClassLoader().getResource(String path)可以这么写:
1 | package testpackage; |
python
1 | import os |
对于当前目录的写法,有:
(1)/ 当前工作目录所在的最顶级目录,即根目录,根目录是相对于其他子目录来说的
(2)./ 当前工作目录
(3)…/ 当前工作目录上一级目录(当前目录的父级目录)
为了更好的说明,我们举两个例子。在运行代码前,首先用getcwd()获取当前工作目录为:C:\Users\86181\PycharmProjects\pythonProject1
代码1:
1 |
|
此时我的img文件夹应该放在与pythonProject1平级的文件夹内:

代码2:
1 | import os |